How to install ROM with Qualcomm Flash Image Loader (QFIL)

0

Installing ROM on some smartphones can be confusing, likewise hard as a result of its chipset.

Installing a ROM on a MediaTek smartphone is sometimes easier than installing a stock ROM on a Qualcomm Snapdragon chipset smartphone.

Today, I am going to guide you on how to install ROM with Qualcomm Flash Image Loader (QFIL).

QFIL is a PC tool for Android specifically meant for flashing or installing stock ROM on Android smartphones.

Half of the Android smartphones in the market run on Qualcomm snapdragon which means that with this tool, you can flash as many smartphones as you wish.

Let us proceed.

Before we get started, I will tell you one thing: the reason why most ROM installations fail is that the user must have missed one of the requirements.

What that means is that if you did not follow the guide carefully or if you missed one of the files or requirements, there is a chance the installation will fail.

Let us start with the requirements.

Requirements to install ROM with QFIL

  1. A PC/Laptop in a good working condition
  2. A detectable USB cord
  3. Qualcomm Flash Image Loader (QFIL)
  4. Qualcomm USB driver (32bit|64bit)
  5. Charge your phone to 30%
  6. Your smartphone’s device driver

After you have gotten all the required files and tools, the next step is to proceed with using Qualcomm Flash Image Loader (QFIL) to install the ROM.

Before proceeding, certainly, ensure your PC is charged or your computer is connected to a power source that won’t go off.

I won’t want you to brick your device, and I know you won’t want that too.

How to install ROM with Qualcomm Flash Image Loader (QFIL)

After you have downloaded all the files, like the drivers and ROM, the first thing to do is to extract them.

Extract the Qualcomm USB driver to your desired folder on your PC.

Install the drivers; you can reboot your PC after installing the drivers. It’s optional.

After installing the drivers, extract the ROM you wish to install.

Extract QFIL and launch the QFIL.exe program; you will the screen below

install ROM with Qualcomm Flash Image Loader (QFIL)

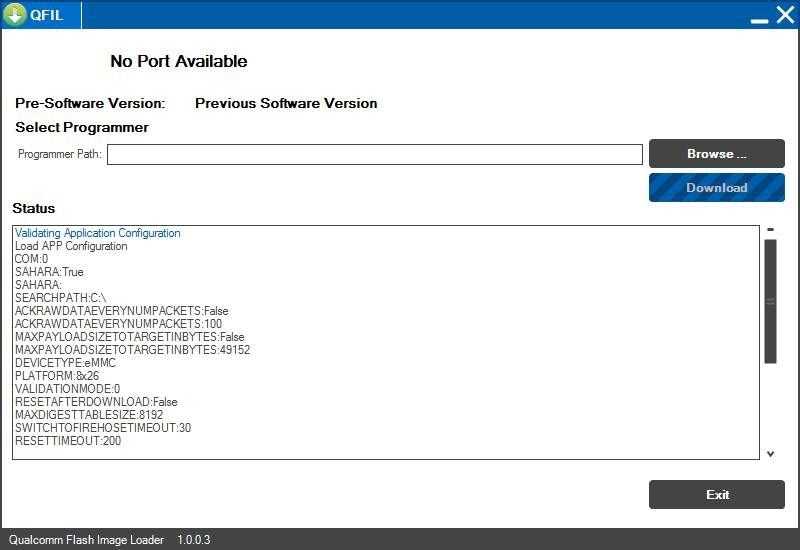
On QFIL, click on Browse to locate the firmware you extracted for installation.

QFIL flashes/install .mbn extensions, this means that you have to locate the .mbn file in the folder.

Once you have located the ROM file, you will get the screen below

Select rom file on QFIL
Select ROM file on QFIL

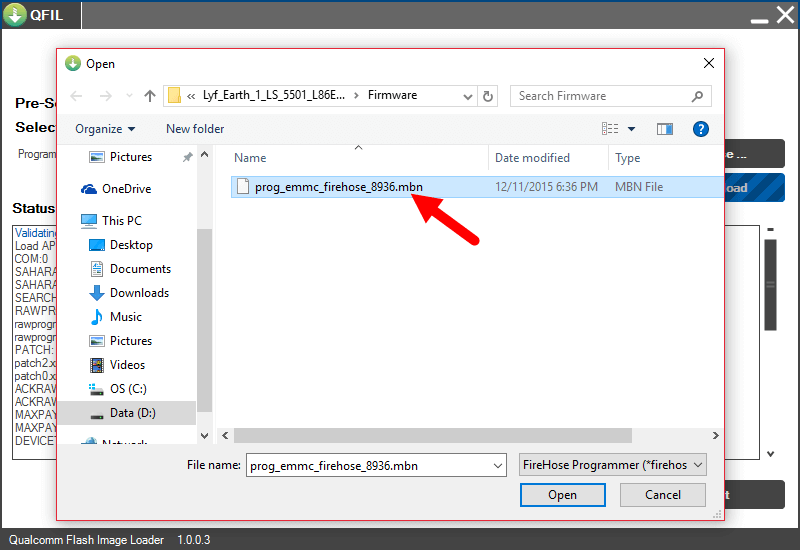
Click Open for QFIL to launch the files and ready them for installation.

Now, power down/off your phone and connect it to the PC.

Download QFIL
Download QFIL

Click on Download to begin installation or flashing.

Installation usually takes time, like 5–10 minutes, likewise the first boot after flashing your phone.

Wait for it to successfully install, and after installation, disconnect your smartphone and boot up the phone.

Conclusion

Just like I said in the beginning, some factors can make this method not work for you.

  1. You didn’t properly install the drivers
  2. The USB cord can charge your phone, but it doesn’t detect on PC.
  3. You are to flash the wrong ROM to your phone.

There might be other factors, but the listed ones above are often the major cause.

Once you fix them, you’re ready to go.

If you experience any difficulty installing ROM with Qualcomm Flash Image Loader (QFIL), drop off a comment below.

How to update Kodi on any Android TV Box

0

Regular updates on any operating system bring a lot of features and fixes such as bug fixes and security updates.

If your software or application is running on an outdated version, you may not be able to enjoy a lot of features or won’t be able to enjoy the software or application to its full potential.

Today, I am going to show you how to update Kodi on any Android TV Box.

Without wasting much of your time, let’s get started.

This guide is mainly for Kodi Updates but can also be used for the first installation of Kodi.

Updating through APK download

This method is mainly for Android TV Box that doesn’t come with Google Play Store.

To get started, head to the browser of your Android TV/Box and input this URL https://kodi.tv/download and press enter to proceed.

You will be taken to the detailed page about Kodi and what it does.

Scroll down to the “Choose your weapon “ section and select Android “ to proceed.

Kodi Select Android
Kodi Select Android

You have to choose the compatible Processor for your Android TV/Box to continue with the download.

You can find the information about your TV Box by checking the manual or installing a device info checker like CPU-Z on your Android TV Box to find out.

Remember, if There is a Googl Play Store installed on your Android TV Box, there no need for this pRocess.

Once you choose your processor, the download process will begin.

Kodi Android processor

You can check your browser download folder for follow-up on the download.

Once the download is finished, you can click on it to begin updates or navigate to your download folder to begin the installation.

Most Android TV will need you to use App installer to install any application on the device.

If that is the case, close your browser and launch the app installer to continue.

If you click the app installer, it will prompt you to locate the download folder or the location of the file that you wish to install.

Navigate to your download folder and select Kodi to begin the installation.

Most Android TV needs you to enable the installation of apps from unknown sources before you can get started, some won’t. You can enable that if required by following the prompt once it shows up or by going to your setting and security and enable it.

The installation will begin and will take just a few minutes to finish updating. Once that is done, Kodi will be upgraded to the latest version of the app.

Update Kodi Google Play Store
Select Google Play to update Kodi

Updating through the Google Play Store.

This method is one of the easiest and also one the best method of updating your Kodi App to the latest version.

Google Play Store search

To get started, you can just do it by

  1. Following Kodi Official site or
  2. Going to Google Play Store app Updates or
  3. Typing “Kodi” in your Google Play Store search.

Updating Kodi through Kodi official site

Click the Kodi download link at the beginning of the post, it will take you to the Kodi download page.

Scroll down and select Android to continue to the next option.

Select Google Play Store and it will take you to the Kodi Google Play Store page.

Click on update to begin the upgrade. That’s it.

Going to Google Play Store app Updates

Google Play Store options

To get started with this method, Launch your Google Play Store and click the = by the left.

Click on my apps and games

Find Kodi and click on Update to begin the upgrade.

Typing “Kodi” in your Play Store search.

Google Play Store search

To get started, Launch the Google Play Store and click on “search for games & apps”.

Type in “Kodi” and select the first app that shows up.

Click on Update to begin the application updates.

The updates will take a few minutes to complete.

Once it’s complete, you can launch Kodi to enjoy the latest version of the app.

If you find any of these guides confusing, please feel free to drop off a comment below.

[Flash File] Samsung Galaxy J2 SM-J200F Firmware Download [Stock Rom]

Looking to install the stock ROM on your Samsung Galaxy J2 SM-J200F? This comprehensive guide provides direct download links for the firmware flash file and clear, step-by-step instructions to get your phone back on track.

Use this firmware file to effectively reset your phone, fix bootloop issues, bypass password locks, resolve device freezing, and address numerous other software problems.

This file is strictly for the Samsung Galaxy J2 SM-J200F.

Downloads by Regions:

Get the firmware file for other regions not listed above here


Step-by-Step Guide to Flashing Samsung Galaxy Firmware Using Odin

Step 1: Download and Install Required Tools

  1. Install Samsung USB Drivers:
    • Download the latest Samsung USB drivers from the official Samsung website or use Samsung Kies to install them automatically.
    • Manually install the drivers if Kies doesn’t do it for you.
  2. Download the Correct Firmware:
    • Ensure the firmware matches your device’s model number, region, and Android version. You can find this information in Settings > About Phone.
  3. Download and Extract Odin:
    • Get the latest version of Odin (v3.14.4 or newer) from a reliable source.
    • Extract the Odin tool to a folder on your PC.

Step 2: Prepare Your Samsung Galaxy Device

  1. Enable Developer Options:
    • Go to Settings > About Phone > Software Information.
    • Tap Build Number 7 times to enable Developer Options.
  2. Enable OEM Unlocking and USB Debugging:
    • Navigate to Settings > Developer Options.
    • Enable OEM Unlocking and USB Debugging.
  3. Power Off Your Device:
    • Turn off your Samsung Galaxy smartphone completely.

Step 3: Boot into Download Mode

  1. Press and hold the Volume Down + Power + Home buttons simultaneously.
  2. When prompted, press Volume Up to enter Download Mode.
  3. Connect your phone to your PC using the USB cable.

Step 4: Configure Odin

  1. Launch Odin by right-clicking Odin.exe and selecting Run as Administrator.
  2. In Odin, ensure the Options tab has Auto Reboot and F. Reset Time checked. Uncheck Repartition to avoid damaging your device.
  3. Click the AP button and select the firmware file you extracted earlier (in .tar or .md5 format).
  4. Wait for Odin to load the firmware. Once it’s ready, you’ll see a blue indicator in the Log Box.

Step 5: Start Flashing

  1. Double-check that Odin detects your device. You should see a blue box under ID:COM with your device’s port number.
  2. Click Start to begin the flashing process. Do not disconnect your phone or interrupt the process.
  3. A progress bar will appear on both your phone and Odin. Wait for the process to complete.

Step 6: Complete the Process

  1. Once flashing is complete, Odin will display a PASS! Message, and your phone will automatically reboot.
  2. Disconnect your phone from the PC and set it up as a new device.

Troubleshooting Common Issues

  • Odin Not Detecting Your Phone:
    • Reinstall Samsung USB drivers.
    • Try a different USB port or cable.
    • Ensure your phone is in Download Mode.
  • Stuck on “SetupConnection”:
    • Restart both your phone and PC.
    • Use a different version of Odin.
  • Boot Loop After Flashing:
    • Perform a factory reset in Recovery Mode (Volume Up + Power + Home).

[Flash File] Samsung Galaxy J2 SM-J200BT Firmware Download [Stock Rom]

Looking to install the stock ROM on your Samsung Galaxy J2 SM-J200BT? This comprehensive guide provides direct download links for the firmware flash file and clear, step-by-step instructions to get your phone back on track.

Use this firmware file to effectively reset your phone, fix bootloop issues, bypass password locks, resolve device freezing, and address numerous other software problems.

This file is strictly for the Samsung Galaxy J2 SM-J200BT.

Samsung Galaxy J2 SM-J200BT Downloads:

Samsung Galaxy J2 SM-J200BT Firmware Download Links
CSC Version Android
Version
Download
Links
XTE J200BTUBU2APK2 5.1.1 Download Spain (Google Drive)

How to Flash Samsung Galaxy J2 SM-J200BT Firmware [Stock Rom]

After downloading the correct firmware for your Samsung Galaxy J2 SM-J200BT, the next crucial step is flashing it onto your device. Whether trying to fix a boot loop, unbrick your phone, or upgrade/downgrade your software, knowing how to flash Samsung firmware safely is essential.

Luckily, the flashing process is similar across most Samsung models, making it easier to follow a universal method.

In this guide, you’ll find everything you need—from required tools and preparation steps to the complete flashing procedure. Follow along carefully to avoid errors and ensure a successful firmware installation.

Complete Samsung Flashing Steps